Wildfire-Resilient Homes: 12 Details That Reduce Ignition Risk
A resilient house is not one fireproof material. It is a coordinated system that limits ember entry, removes vulnerable junctions and reduces the fuel immediately around the building.
By World Arch Journal ·


Project file
- FORMAT: Evidence-led international design guide
- PRIMARY KEYWORD: Wildfire-resilient home design
- SEARCH INTENT: Planning · details · WUI construction
- EDITORIAL LEAD: World Arch Journal
- PUBLISHED: 8 October 2026
- VISUAL MIX: 1 AI-assisted editorial image · 3 original diagrams
Wildfire resilience begins with one uncomfortable fact: a beautiful noncombustible wall cannot compensate for an ember entering an unprotected vent. Homes at the wildland–urban interface are exposed through a chain of small architectural decisions—roof edges, gutters, soffits, windows, decks, fences, planting and the spaces where one material meets another.
The aim is not to promise a “fireproof” house. No building can be guaranteed to survive every event. The aim is to reduce avoidable ignition pathways, match construction to the project’s actual exposure and create a property that does not depend entirely on last-minute defence. NIST describes survival as a balance between fire exposure and structure hardening; because embers can travel far beyond the flame front, a baseline level of ember resistance matters across WUI communities.
The quick answer
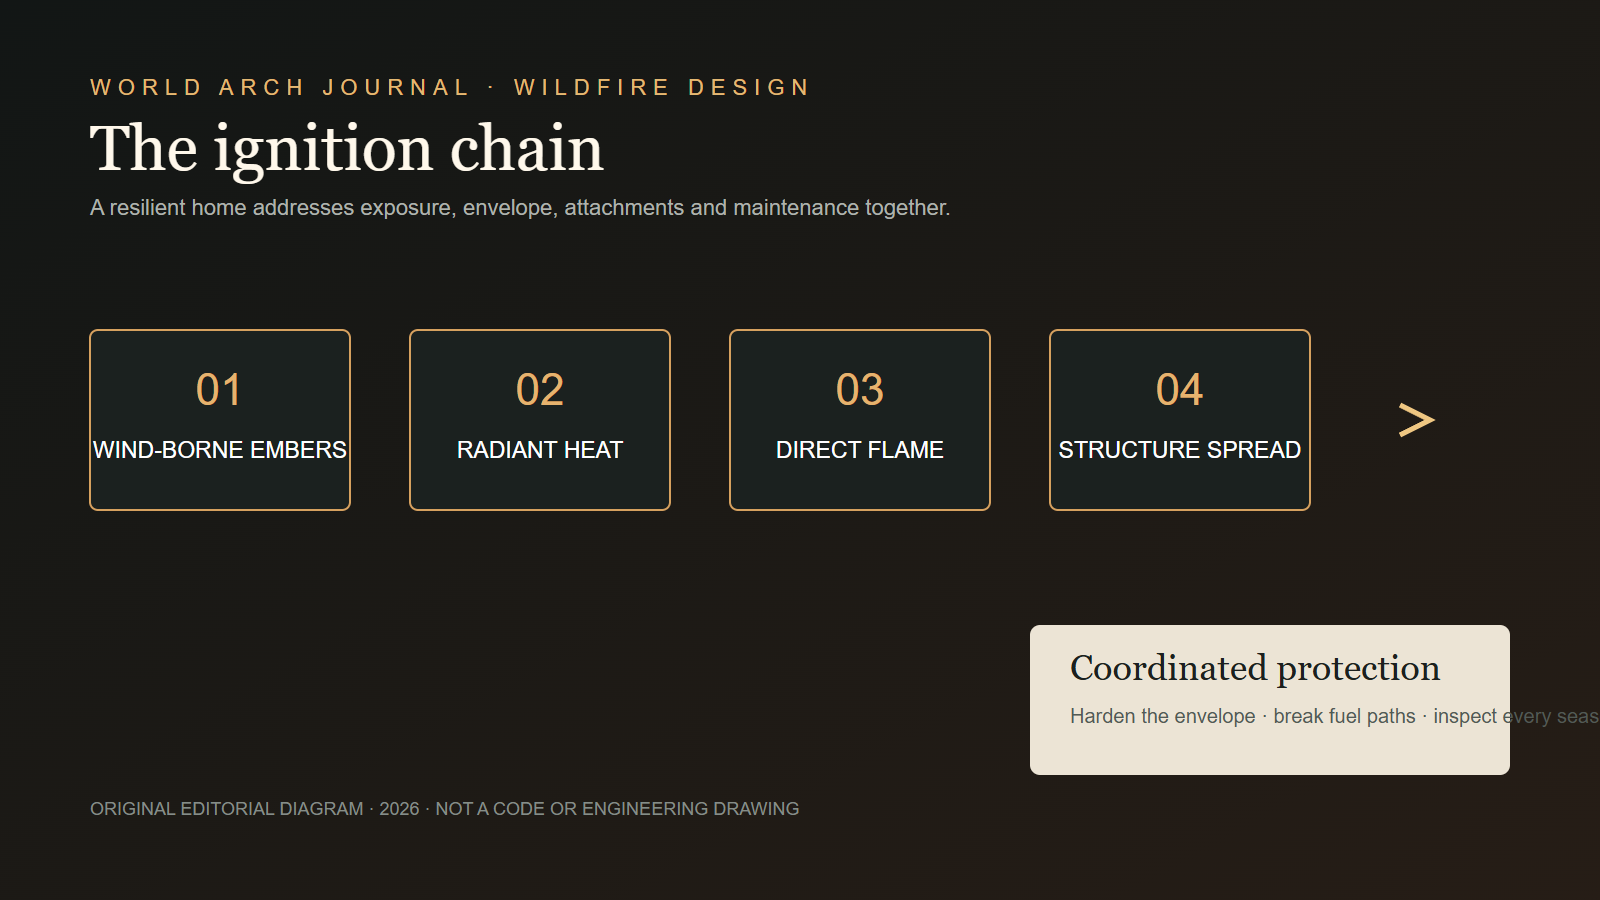
A wildfire-resilient home combines four layers. First, a simple ignition-resistant envelope: roof, vents, eaves, glazing and cladding. Second, careful junctions that prevent embers collecting or entering. Third, a low-fuel zone immediately around the building, with combustible attachments interrupted. Fourth, a maintenance and access plan that keeps the original design effective over time.
| Layer | Primary question | Typical failure |
|---|---|---|
| Envelope | Can embers or radiant heat ignite the assembly? | Open vents, vulnerable roof edges or combustible surfaces |
| Junctions | Where can debris and embers accumulate? | Gutters, re-entrant corners, deck-to-wall gaps and complex roofs |
| Immediate zone | What can burn next to the building? | Mulch, furniture, fences, shrubs, sheds and stored material |
| Operation | Who inspects, clears and closes the weak points? | A resilient specification that is not maintained |
Design for exposure, not a wildfire aesthetic
A metal roof and stone façade may look resilient, but the relevant design input is exposure: embers, radiant heat, direct flame and fire spreading through nearby vegetation or structures. NIST’s Hazard Mitigation Methodology goes beyond a parcel-only view because a shed, fence or neighbouring structure can become part of the fire path. Site planning and building design must therefore be coordinated.
Begin with the applicable WUI map, local code, topography, prevailing wind, vegetation, neighbouring buildings and emergency access. Local requirements may define construction zones, vegetation distances, water supply and fire-service access differently. This article is a design framework, not a substitute for a fire engineer, code official or landscape specialist.
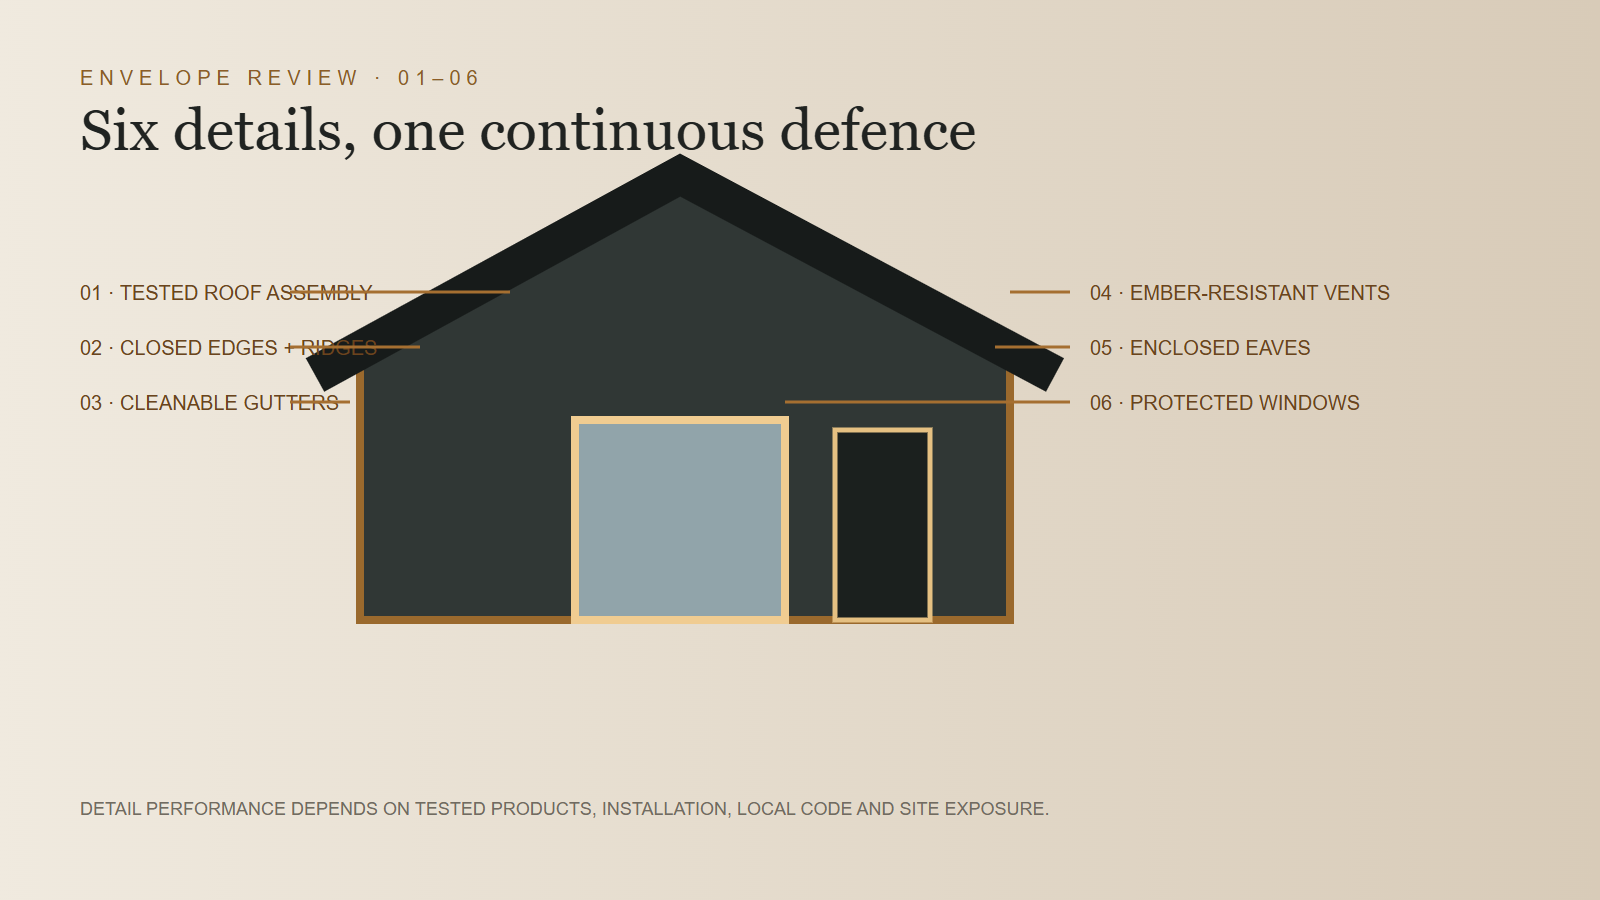
1–3. Make the roof a continuous protective system
1. Use a tested fire-resistant roof assembly
The roof receives large quantities of windborne embers. Specify an assembly appropriate to the local code and exposure, not merely a noncombustible outer sheet. Underlay, gaps, ridges, valleys, penetrations and edge closures belong to the same system. A simple roof form reduces the number of ledges and internal corners where debris can collect.
2. Close edges, ridges and interfaces
Open corrugations, exposed sheathing edges and poorly sealed intersections create routes beneath the roof covering. Detail closures at eaves and ridges, flash penetrations carefully and coordinate solar panels so leaves cannot build up in inaccessible pockets. Photovoltaics and services require the same inspection logic as the roof itself.
3. Treat gutters as a maintenance detail
Metal gutters do not prevent ignition when they contain dry leaves. Design for visible, safe cleaning and consider noncombustible gutter guards that suit the roof and local debris. Downpipes, overflow routes and snow or rain requirements still have to work; resilience should not introduce a new water problem.
4–6. Protect the small openings
4. Specify ember-resistant vents
Vents must balance airflow, moisture management, insects and ember resistance. Use tested products accepted by the local authority and keep them away from known accumulation zones where possible. Do not reduce required ventilation with improvised mesh after construction; solve fire, condensation and indoor-air requirements together.
5. Enclose eaves and simplify soffits
Open eaves expose rafters and create ledges. Enclosed soffits with carefully sealed joints can reduce vulnerability, but recessed lights, vents and service penetrations must be coordinated. Complex stepped roofs often produce hidden cavities that are difficult to inspect and maintain.
6. Design windows as complete openings
Glass, frame, seals, shutters and adjacent vegetation all influence performance. Tempered multi-pane glazing is commonly used to improve resistance to heat exposure, yet the exact assembly must follow local testing and code. Reduce vulnerable glazing near high-fuel areas, protect seals and frames, and keep combustible furniture or curtains from becoming an interior ignition path if glazing fails.
7–9. Remove the weak links between assemblies
7. Continue ignition-resistant cladding through the details
Cladding performance depends on corners, bases, cavities, joints and interfaces—not only the field material. Coordinate the wall with the rainscreen cavity, insulation, fire stopping and openings. A noncombustible finish over a vulnerable cavity is not a complete strategy.
8. Separate decks from the house
Decks collect leaves underneath and place furniture directly against glazing. Use appropriate materials, close or manage the underside, provide cleanable junctions and avoid trapping debris at the wall. Where exposure is high, a noncombustible terrace or a deliberate separation may be more robust than a continuous combustible deck.
9. Interrupt fences, pergolas and small structures
NIST post-fire work identifies fences and nearby structures as important vulnerabilities. A fence that connects directly to the building can carry fire to the façade. Introduce a noncombustible section or separation near the house, and keep sheds, fuel storage and similar structures at a distance established by the project’s risk assessment.
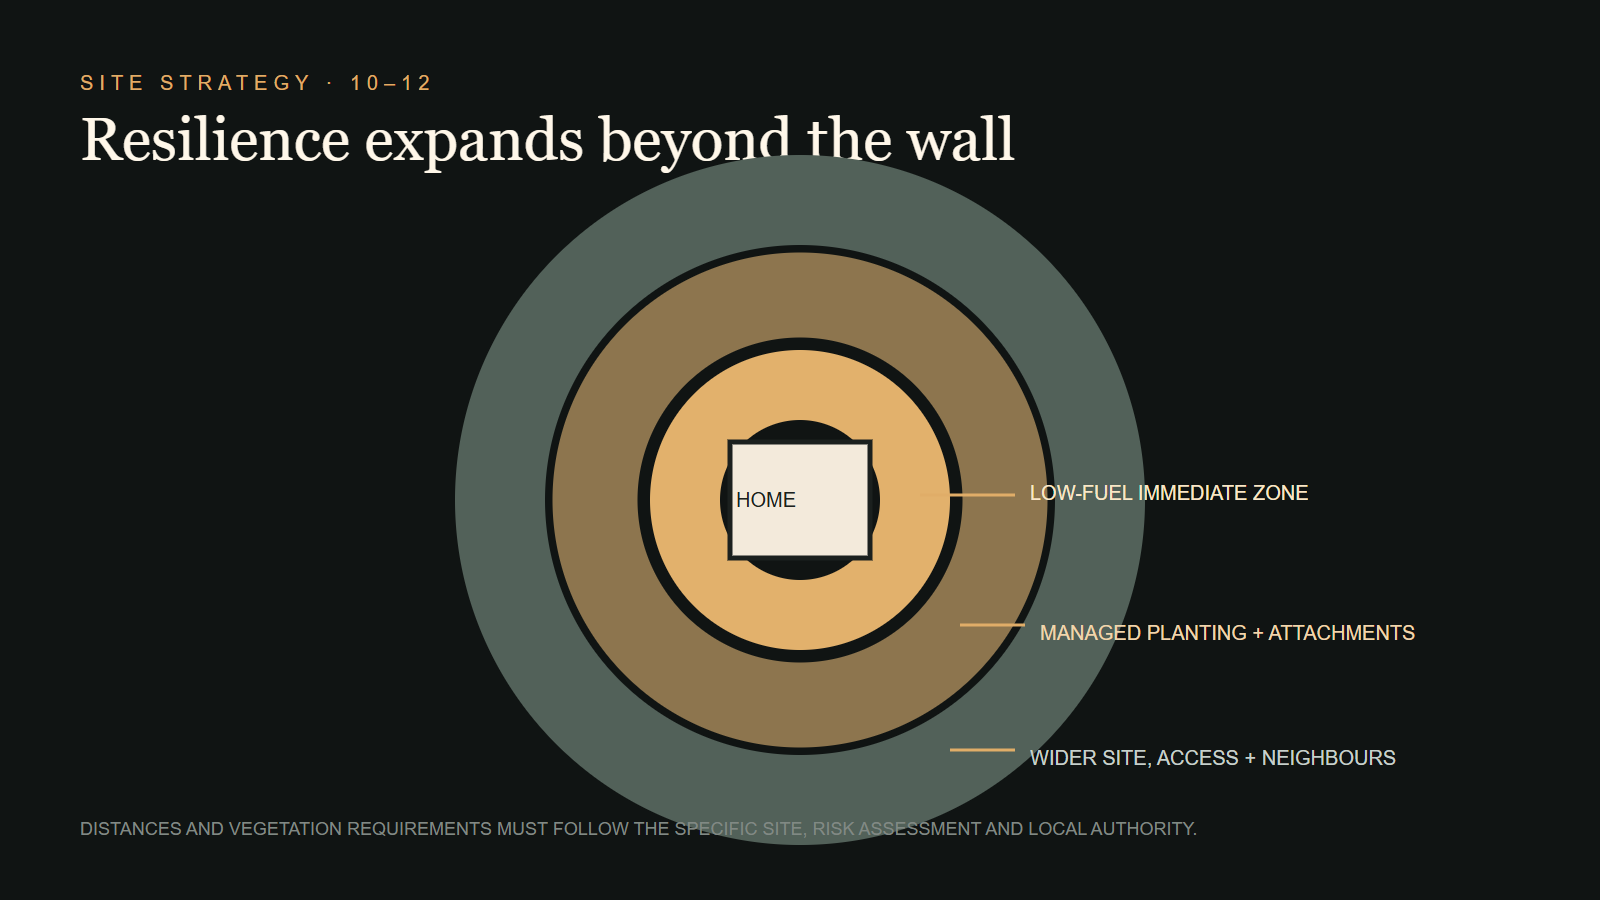
10–12. Design the immediate landscape and response route
10. Create a low-fuel immediate zone
The first metres around the building should not be treated as decorative leftover space. Use noncombustible paving, gravel or carefully selected low-fuel planting; avoid accumulated dry mulch and vegetation touching walls or overhanging roofs. Plant choice alone is not enough—spacing, irrigation, pruning and seasonal maintenance determine the real fuel load.
11. Manage the wider site as changing infrastructure
Trees and habitat can remain part of a responsible design, but dead material, continuous canopies and unmanaged understory can create a fire path. Work with qualified local specialists to preserve ecological value while reducing dangerous continuity. The strategy should respond to slope and wind rather than impose a generic ring around every site.
12. Protect access, address and water coordination
Fire-service access, turning space, visible addressing, gates and water arrangements are code and operations issues, not graphic-plan annotations. Confirm them early, along with evacuation routes for occupants. The building should be designed to stand alone as far as practicable because a large event can expose more structures than responders can defend.
A project workflow from survey to handover
- Map the exposure. Record vegetation, slope, wind, adjacent structures, access and applicable WUI requirements.
- Choose a simple form. Reduce roof traps, hidden cavities and combustible projections before specifying products.
- Draw the ignition paths. Use large-scale details at roof edges, vents, windows, decks and attachments.
- Coordinate landscape and architecture. The immediate zone, fences and outbuildings are part of the envelope strategy.
- Verify products and assemblies. Record tests, approvals, installation requirements and substitutions.
- Inspect construction. Small gaps and site changes can undermine the documented intent.
- Issue a maintenance plan. Assign gutter clearing, vegetation management, vent inspection and seasonal readiness.
The 12-detail checklist
Before tender, confirm: roof assembly; edge and ridge closures; maintainable gutters; accepted ember-resistant vents; enclosed eaves; protected window assemblies; continuous ignition-resistant wall details; robust deck junctions; interrupted fences and attachments; a low-fuel immediate zone; managed wider vegetation; and coordinated emergency access. Then ask one final question: can the owner realistically keep every measure working?
Wildfire resilience is strongest when it is quiet. The house can still be open, warm and connected to landscape. The difference is that every attractive element—roof line, terrace, window, garden and pergola—has also been examined as part of a possible ignition sequence.
Continue exploring: the non-combustible skin is where wildfire design becomes material choice — compare the travertine facade studies for stone cladding behaviour and format, and read the companion guide to flood-resilient homes for the hazard-by-hazard method. For the heat-load side of the same envelope brief, see our climate responsive facade strategies.
Frequently asked questions
Can a house be completely fireproof?
No. Design can reduce ignition risk and improve resilience, but survival depends on exposure, construction, maintenance, neighbouring fuels and the severity of the event.
What is the most important wildfire design detail?
There is no single detail. Ember-resistant openings, a robust roof and a low-fuel immediate zone must work as a coordinated system.
Is a metal roof enough for a wildfire-resilient home?
No. The complete roof assembly, edges, gaps, underlay, penetrations, gutters and nearby fuel all matter.
Does defensible space mean removing every tree?
Not necessarily. It means reducing dangerous fuel continuity through site-specific spacing, pruning, material choices and maintenance with qualified local advice.
What is the home ignition zone?
The area immediately around the house where fuels decide whether embers find a start. This guide treats it as a low-fuel immediate zone — non-combustible surfaces, interrupted fences and attachments, no stored fuel against the walls — backed by managed vegetation further out. Most home ignitions begin here, not in the flame front.
What are the best building materials for a wildfire-resilient home?
Non-combustible and ignition-resistant assemblies: metal, tile or rated composite roofs with closed edges; stone, fibre-cement or rendered cladding; enclosed eaves; ember-resistant vents; and multi-pane tempered windows. The material is only half the answer — gaps, junctions and maintenance decide whether the assembly performs.
Evidence and source notes
- National Institute of Standards and Technology — Structure survival depends on balancing wildfire exposure with structure hardening; baseline ember resistance is essential.
- National Institute of Standards and Technology — Hazard mitigation should address spatial relationships among vegetation, secondary structures and primary buildings, not only the individual parcel.
- National Institute of Standards and Technology — Post-fire research identifies vulnerabilities including fences, raised foundations and ember exposure.
- National Institute of Standards and Technology — Measurement science supports test methods, building materials, landscaping guidance and community planning for WUI resilience.
Related architecture stories
- Flood-Resilient Homes: 10 Design Moves for Faster Recovery
The strongest flood strategy first avoids exposure, then protects life and structure, and finally assumes recovery must be quick, safe and designed in advance.
- MVHR Explained: Mechanical Ventilation with Heat Recovery for Healthy, Efficient Homes
How MVHR works, when it earns its cost, and the design details that decide whether yours is silent and effective or noisy and disappointing.
- Why Your Home Gets Damp: Condensation, Mould and How Design Fixes Them
The three kinds of damp, how to tell them apart, and the fixes in order of cost and effectiveness — from saucepan lids to the retrofit details that solve it permanently.
📌 Never miss a story — add World Arch Journal as your preferred source on Google: https://www.google.com/preferences/source?q=worldarchjournal.com